> ## Documentation Index
> Fetch the complete documentation index at: https://www.carstoragesoftware.com/docs/llms.txt
> Use this file to discover all available pages before exploring further.
# Set up event checklists
> Add a check-off list to a service so staff complete the same steps every time before they finish the visit.
## What you will accomplish
You will turn on **Enable Checklist** for one service and add the items staff must check during that visit.
When the list is ready, a technician who opens the event sees the same groups and items every time—for example **Wheels & tires**, **Safety**, and **Mechanical**. Required items must be finished before the event can be marked complete.
That protects your facility. It also gives the owner a clear record of what was inspected.
## When to use a checklist
Use a checklist when the work is the same list of checks on many cars.
Good fits:
* Monthly or weekly storage inspections (tire pressure, battery, fluids).
* Intake or pickup walk-arounds that should not skip safety items.
* Shop tasks where a missed step causes a comeback or a claim.
Skip a checklist for a short visit with no repeating steps—for example a one-hour detail with no inspection list.
**This is not an Operations workflow**
An **event checklist** lives on one event type and appears during that event's walkthrough.
An **Operations workflow** is a named, multi-step process you start from a car or the calendar (intake, pickup, transport). If you need a longer process with several services in order, use [Create operations workflows](/docs/settings/create-operations-workflows) instead.
## Before you start
* You can open [Settings > Services & schedule](https://www.carstoragesoftware.com/dashboard/settings/events) as an owner or admin.
* The event type already exists. If not, start with [Configure event types](/docs/events/configure-event-types).
* Write down the real checks your team already does on paper or from memory.
* Decide which items are **Required** (must be done before finish) and which are optional reminders.
## Open the service and turn on Enable Checklist
Go to [Settings > Services & schedule](https://www.carstoragesoftware.com/dashboard/settings/events).
**Expected result:** You see a card for each service.
Find the service that should have the list—for example **Internal Service**—and click **Advanced**.
**Expected result:** The **Edit Event Type** page opens. Changes save as you work. Look for **Saved** near the top.
Scroll past **Features** and **Event Scope** until you see **Enable Checklist**.
The helper text says: **Add a checklist that must be completed during this event**.
Flip **Enable Checklist** on.
**Expected result:** A **Checklist Items** box appears. The heading says **Add items that need to be checked during this event**. If the list is empty, you see **No checklist items**.
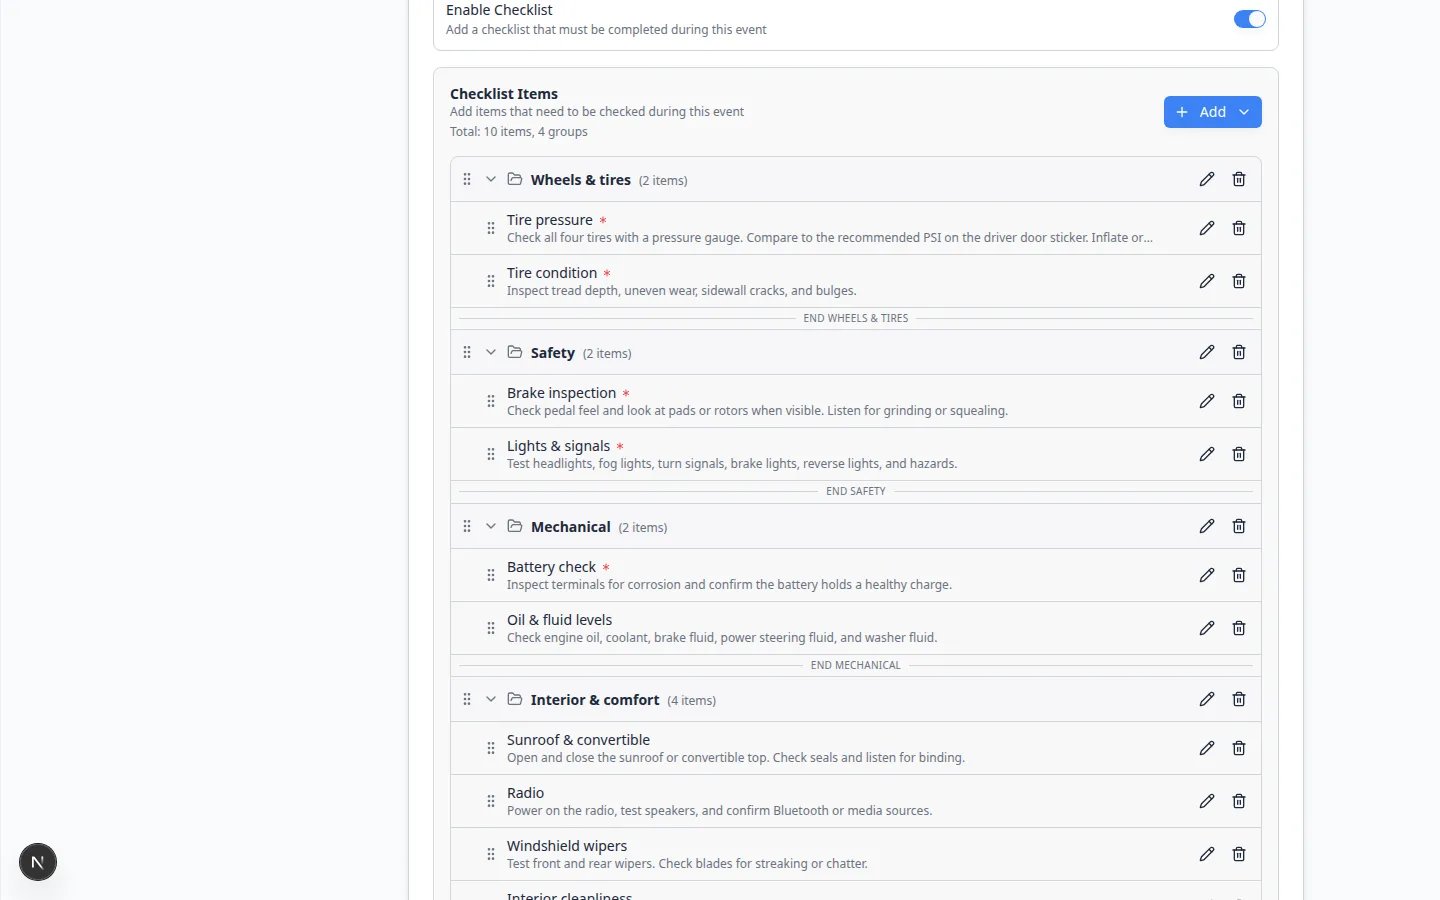 ***Enable Checklist** reveals **Checklist Items**. Groups such as **Wheels & tires** and **Safety** keep a long list easy to scan. A red star means the item is **Required**.*
## Add a checklist item
In the **Checklist Items** header, click **Add**, then click **Checklist Item**.
**Expected result:** An **Add Checklist Item** window opens. The helper text says **Search suggestions or create a custom checklist item**.
Type a short name in **Item Name**, or pick a suggestion such as **Exterior cleanliness**.
Good names: **Tire pressure**, **Battery check**, **Lights & signals**.
**Why this matters:** Staff see this name on the car. Keep it in everyday words, not shop codes.
Open **Group** and pick an existing group, or type a new group name.
Helpful groups: **Wheels & tires**, **Safety**, **Mechanical**, **Interior & comfort**.
**Required** means: **Must be completed before event can be finished**.
Turn it on for safety and condition checks. Leave it off for nice-to-have reminders such as radio or interior cleanliness.
When you create a custom name, a **Description** box appears. Use it for the how-to, not the title.
Example for **Tire pressure**: "Check all four tires with a pressure gauge. Compare to the recommended PSI on the driver door sticker."
Click **Done** (or the create button if you typed a new name).
**Expected result:** The item appears in the list. Required items show a red star. The header shows a count such as **Total: 10 items, 4 groups**.
***Enable Checklist** reveals **Checklist Items**. Groups such as **Wheels & tires** and **Safety** keep a long list easy to scan. A red star means the item is **Required**.*
## Add a checklist item
In the **Checklist Items** header, click **Add**, then click **Checklist Item**.
**Expected result:** An **Add Checklist Item** window opens. The helper text says **Search suggestions or create a custom checklist item**.
Type a short name in **Item Name**, or pick a suggestion such as **Exterior cleanliness**.
Good names: **Tire pressure**, **Battery check**, **Lights & signals**.
**Why this matters:** Staff see this name on the car. Keep it in everyday words, not shop codes.
Open **Group** and pick an existing group, or type a new group name.
Helpful groups: **Wheels & tires**, **Safety**, **Mechanical**, **Interior & comfort**.
**Required** means: **Must be completed before event can be finished**.
Turn it on for safety and condition checks. Leave it off for nice-to-have reminders such as radio or interior cleanliness.
When you create a custom name, a **Description** box appears. Use it for the how-to, not the title.
Example for **Tire pressure**: "Check all four tires with a pressure gauge. Compare to the recommended PSI on the driver door sticker."
Click **Done** (or the create button if you typed a new name).
**Expected result:** The item appears in the list. Required items show a red star. The header shows a count such as **Total: 10 items, 4 groups**.
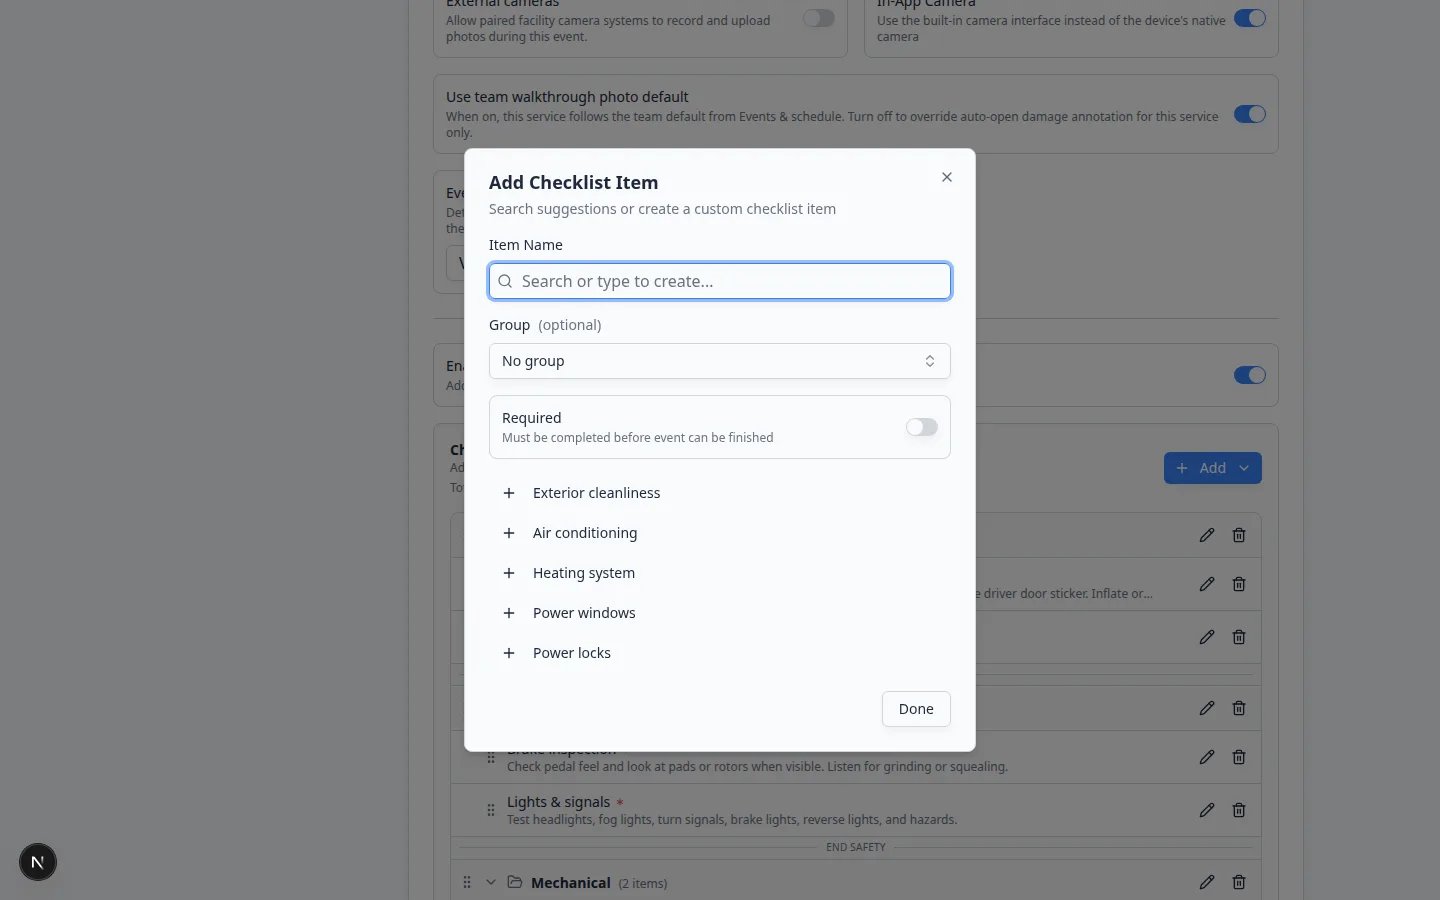 *Search a suggested item or type your own **Item Name**. Use **Group** to keep related checks together. Turn on **Required** for anything that must be done before finish.*
## Add a group and keep the list tidy
Use **Group** when you already know the section name and want an empty folder first.
Use the six-dot handle on the left of a row to drag an item under a group.
**Expected result:** Group headers show a count, such as **Wheels & tires (2 items)**.
Use the pencil to change the name, group, required setting, or description. Use the trash can to remove a row.
**Why this matters:** A short, current list gets used. A stale list gets skipped.
**Start small.** Ten clear items in four groups is easier than thirty mixed items. Add more after the team has used the list for a week.
**Required vs optional.** If everything is required, staff may rush. Reserve **Required** for the checks that protect the car or the facility.
## Test the checklist on a real visit
Settings only build the list. Staff use it when they open the event.
Go to [Schedule](https://www.carstoragesoftware.com/dashboard/schedule) and find an appointment that uses this event type. You can also start one from [Create event](https://www.carstoragesoftware.com/dashboard).
Open the appointment, then click **Open Event** (not only **Edit Event**).
**Why this matters:** **Edit Event** changes the plan (time, notes). **Open Event** starts the walkthrough where the checklist lives.
On the walkthrough you should see a **Checklist** step with **Overall Progress** and **Required items**.
Groups appear as sections. Required rows say **Required** in red.
**Expected result:** You cannot finish the event until every required box is checked. Optional items can stay unchecked.
*Search a suggested item or type your own **Item Name**. Use **Group** to keep related checks together. Turn on **Required** for anything that must be done before finish.*
## Add a group and keep the list tidy
Use **Group** when you already know the section name and want an empty folder first.
Use the six-dot handle on the left of a row to drag an item under a group.
**Expected result:** Group headers show a count, such as **Wheels & tires (2 items)**.
Use the pencil to change the name, group, required setting, or description. Use the trash can to remove a row.
**Why this matters:** A short, current list gets used. A stale list gets skipped.
**Start small.** Ten clear items in four groups is easier than thirty mixed items. Add more after the team has used the list for a week.
**Required vs optional.** If everything is required, staff may rush. Reserve **Required** for the checks that protect the car or the facility.
## Test the checklist on a real visit
Settings only build the list. Staff use it when they open the event.
Go to [Schedule](https://www.carstoragesoftware.com/dashboard/schedule) and find an appointment that uses this event type. You can also start one from [Create event](https://www.carstoragesoftware.com/dashboard).
Open the appointment, then click **Open Event** (not only **Edit Event**).
**Why this matters:** **Edit Event** changes the plan (time, notes). **Open Event** starts the walkthrough where the checklist lives.
On the walkthrough you should see a **Checklist** step with **Overall Progress** and **Required items**.
Groups appear as sections. Required rows say **Required** in red.
**Expected result:** You cannot finish the event until every required box is checked. Optional items can stay unchecked.
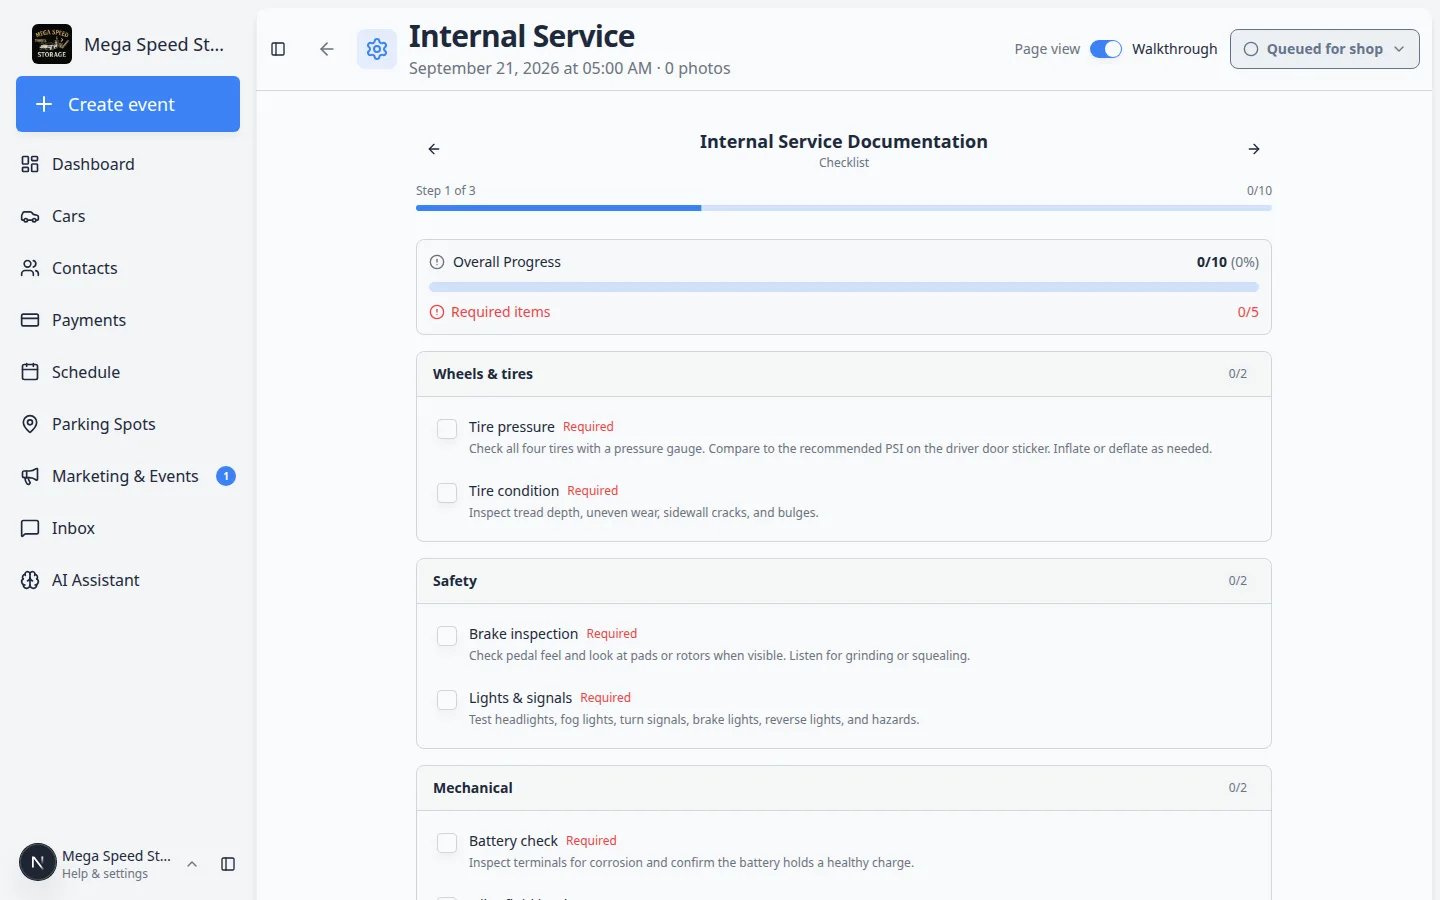 *Staff see the same groups and required items during **Open Event**. **Required items** must reach complete before the visit can be finished.*
## What success looks like
* Every repeating inspection uses the same list—no one relies on memory.
* Required safety items block finish until they are done.
* New teammates can follow the descriptions without asking what “check the car” means.
* The finished event keeps a record of what was checked.
## Troubleshooting
**I do not see Enable Checklist**
You may be in the guided **Set up** wizard instead of **Advanced**. Open the service from [Settings > Services & schedule](https://www.carstoragesoftware.com/dashboard/settings/events) and click **Advanced**.
**Staff do not see the list on the event**
Confirm **Enable Checklist** is on and at least one item exists. Then open the appointment with **Open Event**, not only **Edit Event**. If the event type was changed after the appointment was created, start a new test event.
**Staff can finish without checking anything**
Turn **Required** on for the items that must be done. Optional items never block finish.
**The list looks empty even though Enable Checklist is on**
Click **Add** → **Checklist Item** and save at least one row. A switch with zero items does not help the floor team.
## What to do next
Train technicians with [Run event workflow from Schedule](/docs/schedule/run-event-workflow-from-schedule).
If finishing this event should also count toward a recurring care plan, see [Set up service plans](/docs/events/set-up-service-plans). The service-plans step can map a checklist row to a plan check.
If staff also need progress labels such as **In the bay** or **Waiting on parts**, continue with [Turn on custom statuses for an event type](/docs/events/turn-on-custom-statuses-for-an-event-type).
When the list works on one test car, run [Test an event setup](/docs/events/test-an-event-setup) before you ask the whole team to use it.
## Related topics
- [Customize Create event screen layout](/docs/events/customize-create-event-screen-layout.md)
- [Turn on custom statuses for an event type](/docs/events/turn-on-custom-statuses-for-an-event-type.md)
- [Configure scheduling and booking options](/docs/events/configure-scheduling-and-booking-options.md)
- [Events overview](/docs/events/overview.md)
- [Set up event notifications and reminders](/docs/events/set-up-event-notifications-and-reminders.md)
This documentation is built and hosted on [Mintlify](https://mintlify.com), a developer documentation platform.
*Staff see the same groups and required items during **Open Event**. **Required items** must reach complete before the visit can be finished.*
## What success looks like
* Every repeating inspection uses the same list—no one relies on memory.
* Required safety items block finish until they are done.
* New teammates can follow the descriptions without asking what “check the car” means.
* The finished event keeps a record of what was checked.
## Troubleshooting
**I do not see Enable Checklist**
You may be in the guided **Set up** wizard instead of **Advanced**. Open the service from [Settings > Services & schedule](https://www.carstoragesoftware.com/dashboard/settings/events) and click **Advanced**.
**Staff do not see the list on the event**
Confirm **Enable Checklist** is on and at least one item exists. Then open the appointment with **Open Event**, not only **Edit Event**. If the event type was changed after the appointment was created, start a new test event.
**Staff can finish without checking anything**
Turn **Required** on for the items that must be done. Optional items never block finish.
**The list looks empty even though Enable Checklist is on**
Click **Add** → **Checklist Item** and save at least one row. A switch with zero items does not help the floor team.
## What to do next
Train technicians with [Run event workflow from Schedule](/docs/schedule/run-event-workflow-from-schedule).
If finishing this event should also count toward a recurring care plan, see [Set up service plans](/docs/events/set-up-service-plans). The service-plans step can map a checklist row to a plan check.
If staff also need progress labels such as **In the bay** or **Waiting on parts**, continue with [Turn on custom statuses for an event type](/docs/events/turn-on-custom-statuses-for-an-event-type).
When the list works on one test car, run [Test an event setup](/docs/events/test-an-event-setup) before you ask the whole team to use it.
## Related topics
- [Customize Create event screen layout](/docs/events/customize-create-event-screen-layout.md)
- [Turn on custom statuses for an event type](/docs/events/turn-on-custom-statuses-for-an-event-type.md)
- [Configure scheduling and booking options](/docs/events/configure-scheduling-and-booking-options.md)
- [Events overview](/docs/events/overview.md)
- [Set up event notifications and reminders](/docs/events/set-up-event-notifications-and-reminders.md)
This documentation is built and hosted on [Mintlify](https://mintlify.com), a developer documentation platform.