> ## Documentation Index
> Fetch the complete documentation index at: https://www.carstoragesoftware.com/docs/llms.txt
> Use this file to discover all available pages before exploring further.
# Edit your website with the AI website editor
> Describe a change in plain words and watch your public facility page update in a live preview. Page changes stay in a draft until you publish.
## What you will accomplish
You will change your public facility page by describing what you want, for example "Add a winter storage section with a button to inquire." The website editor updates the page in a live preview and keeps your page changes in a draft until you publish.
**This editor is in beta**
We are turning the website editor on team by team. If you do not see **Open website editor (beta)**, your team does not have it yet. Contact support if you would like to try it. The classic **Page editor** keeps working either way, and both edit the same website.
## Before you start
* You need edit access to **Marketing**. Without it, the **Open website editor (beta)** button does not appear.
* **Public Facility Pages** must be on, and your **Facility slug** must be saved. See [Configure the facility landing page](/docs/facility-web-pages/configure-the-facility-landing-page).
* Check your logo and colors in [Settings > Branding](https://www.carstoragesoftware.com/dashboard/settings/branding). The editor designs with your brand colors.
## Open the website editor
Open [Settings > Website & customer app](https://www.carstoragesoftware.com/dashboard/settings/website) and scroll to **Public website**.
The button sits at the top right of the **Page editor** card. The words are **Open website editor** with **(beta)** in lighter text beside them.
**Expected result:** The website editor opens full screen with your team's draft. If there is no draft yet, it starts from your live page.
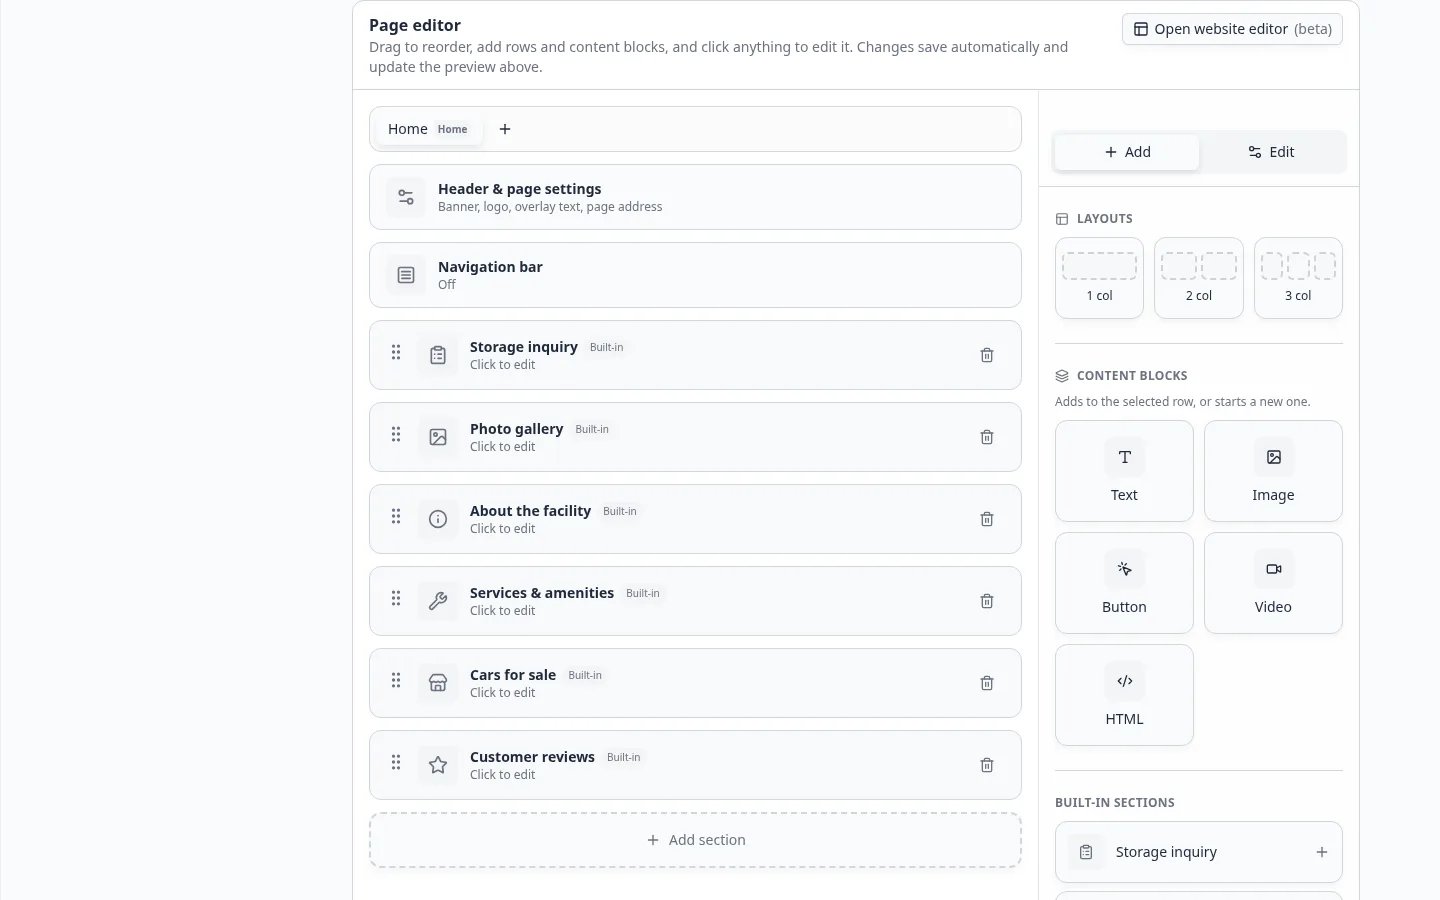 ***Open website editor** **(beta)** sits on the **Page editor** card. You need edit access to **Marketing**, and your team must have the beta.*
To go back to settings, click the arrow at the top left. Your draft is saved first.
## Find your way around
| Area | What it does |
| - | - |
| **Top bar** | Your pages as tabs (the arrow on the current tab opens its options), **+** to add a blank page, the save status, **Discard**, and **Publish**. |
| **Chat** (left) | The **Website designer**. Describe a change and send it. |
| **Page** (middle) | Your real page in your brand colors. Click any part of it to select it. |
| **Manual edit** (right) | Three tabs: **Structure** lists the sections so you can drag, select, or remove them. **Add** inserts layouts, text, images, buttons, videos, HTML blocks, and built-in sections. **Edit** shows the settings for whatever you selected. The panel starts closed so the page has room. It opens when you click part of the page. Click **Manual edit** above the page to show or hide it. |
The save status in the top bar tells you where you are: **Saving…**, **Draft saved**, **Unpublished changes**, **Live** when the draft matches your public page, or **Save failed** if a save did not go through.
***Open website editor** **(beta)** sits on the **Page editor** card. You need edit access to **Marketing**, and your team must have the beta.*
To go back to settings, click the arrow at the top left. Your draft is saved first.
## Find your way around
| Area | What it does |
| - | - |
| **Top bar** | Your pages as tabs (the arrow on the current tab opens its options), **+** to add a blank page, the save status, **Discard**, and **Publish**. |
| **Chat** (left) | The **Website designer**. Describe a change and send it. |
| **Page** (middle) | Your real page in your brand colors. Click any part of it to select it. |
| **Manual edit** (right) | Three tabs: **Structure** lists the sections so you can drag, select, or remove them. **Add** inserts layouts, text, images, buttons, videos, HTML blocks, and built-in sections. **Edit** shows the settings for whatever you selected. The panel starts closed so the page has room. It opens when you click part of the page. Click **Manual edit** above the page to show or hide it. |
The save status in the top bar tells you where you are: **Saving…**, **Draft saved**, **Unpublished changes**, **Live** when the draft matches your public page, or **Save failed** if a save did not go through.
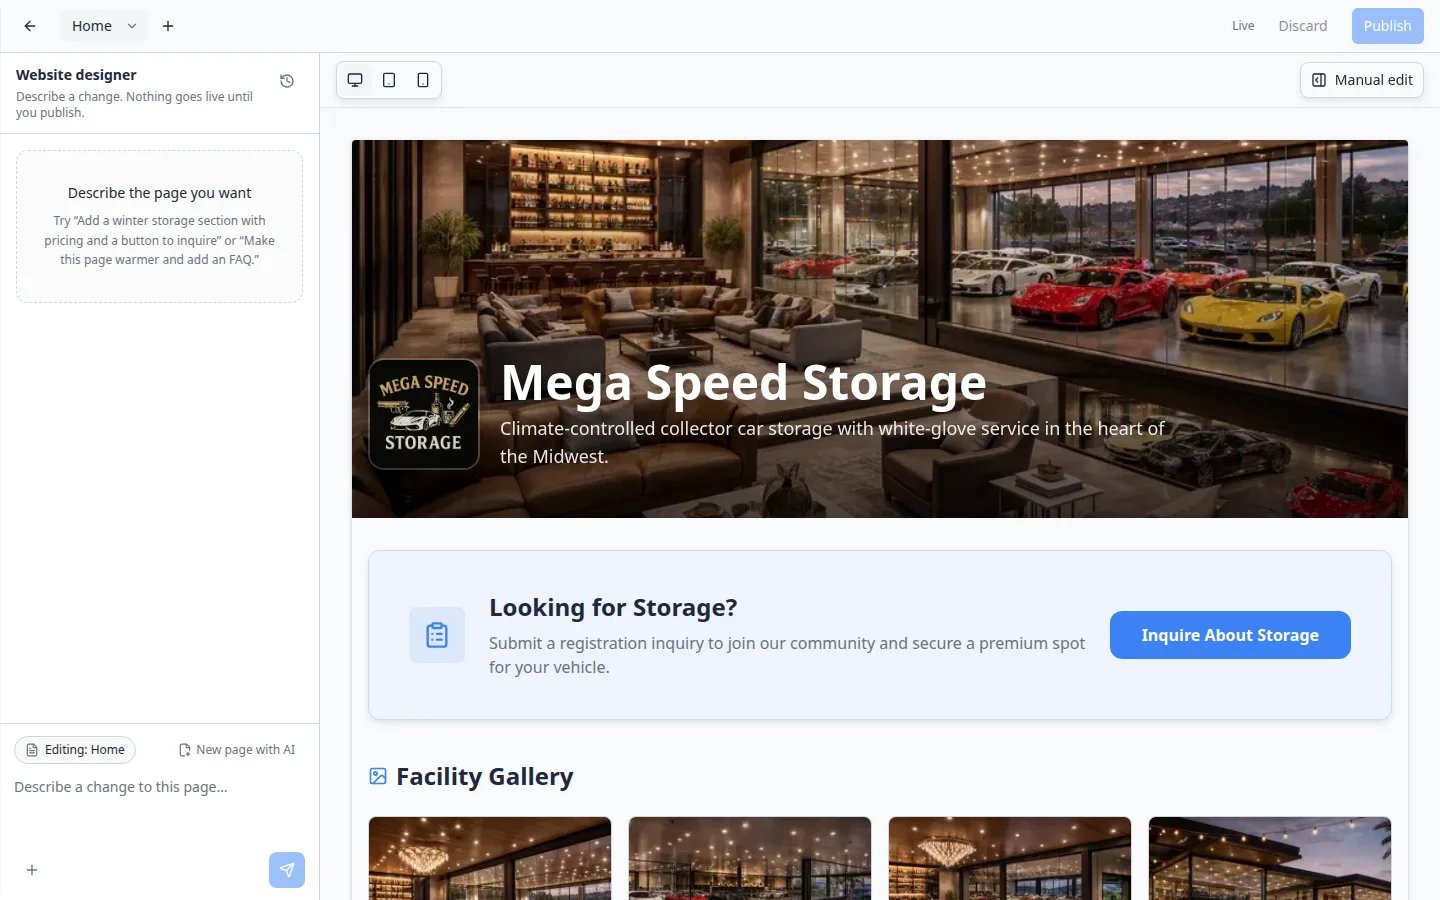 *The editor is one screen: **Website designer** chat on the left, your page in the middle, and **Publish** at the top right. Nothing on the public site changes until you publish.*
## Describe a change
Write the request in the box at the bottom of the chat. Press **Enter** to send, or **Shift+Enter** for a new line.
**Example:** "Add a winter storage section: indoor spots from \$150 a month, open until November 1, and a button to the storage inquiry form."
A progress card shows what the designer is doing, such as finding photos, writing the page, or reviewing it. Click **Cancel** to stop. The page is locked while the designer works.
The page updates in the middle, and the designer explains what it changed. Ask for more changes in the same chat, or adjust anything by hand in **Manual edit**.
### Prompts that work well
* "Make this page warmer and more welcoming, and add an FAQ about winter storage."
* "Add a section about our detailing service with a photo of a classic car being polished."
* "Move the reviews higher and add a short line above them about 20 years in business."
* "Add a button to our Cars and Coffee event." The designer can look up your upcoming events.
* "Add a 'Call us' button for (555) 123-4567." For another website, paste the full address, starting with `https://`.
Be specific about prices, dates, and names. The designer only uses facts you give it or facts already on your page.
### Edit the whole page or one section
Above the message box, a small label shows what your next message will change:
**Editing: Home** (or another page name) changes the whole page.
**Editing: About the facility** (or another section name) appears after you click a section on the page. Only that section changes. Small section edits are also faster.
Click the **x** on the label to go back to the whole page.
### Create a new page with AI
Click **New page with AI** next to the label, then describe the page, for example "Winter storage with pricing and an FAQ." The designer creates the page and opens it. If your site has a navigation bar, the new page is added to it. If it does not, a message offers **Turn on navigation**, which turns on the bar with a link to each of your pages.
To start from a blank page instead, click **+** next to the page tabs and add sections from **Manual edit**. The blank page is called **New page** until you rename it (see below), and it is not added to the navigation bar. Add a link to it under **Structure** > **Navigation bar**.
### Rename, reorder, or delete a page
Open the page, then click the small arrow next to its name in the page tabs. The menu has:
**Rename page** changes the page name and its address (`/p/…`). The home page has no address. Navigation bar links that show the old name switch to the new one.
**Move left** and **Move right** change the order of the page tabs. The home page always stays first.
**Delete page** removes the page after you confirm, together with its navigation bar links. You cannot delete the home page.
Like every other change, these go to your draft. Your live site changes when you publish.
## Use your own photos
Click the **+** button (**Attach images**) in the message box and choose up to five images, such as your building, your team, or your logo.
**Example:** "Use the attached photo of our front gate in the new winter storage section."
Your images are saved to [Marketing Assets](https://www.carstoragesoftware.com/dashboard/marketing/assets) in the **Website uploads** folder, so you can reuse them later. If the designer cannot use an attachment, it tells you after the update.
## Preview on desktop, tablet, and phone
Use the three device buttons above the page to switch between **Desktop view**, **Tablet view**, and **Phone view**. The page rearranges itself exactly as it will for visitors on that screen size. Check the phone view before you publish, because many prospects open your link from a text message.
*The editor is one screen: **Website designer** chat on the left, your page in the middle, and **Publish** at the top right. Nothing on the public site changes until you publish.*
## Describe a change
Write the request in the box at the bottom of the chat. Press **Enter** to send, or **Shift+Enter** for a new line.
**Example:** "Add a winter storage section: indoor spots from \$150 a month, open until November 1, and a button to the storage inquiry form."
A progress card shows what the designer is doing, such as finding photos, writing the page, or reviewing it. Click **Cancel** to stop. The page is locked while the designer works.
The page updates in the middle, and the designer explains what it changed. Ask for more changes in the same chat, or adjust anything by hand in **Manual edit**.
### Prompts that work well
* "Make this page warmer and more welcoming, and add an FAQ about winter storage."
* "Add a section about our detailing service with a photo of a classic car being polished."
* "Move the reviews higher and add a short line above them about 20 years in business."
* "Add a button to our Cars and Coffee event." The designer can look up your upcoming events.
* "Add a 'Call us' button for (555) 123-4567." For another website, paste the full address, starting with `https://`.
Be specific about prices, dates, and names. The designer only uses facts you give it or facts already on your page.
### Edit the whole page or one section
Above the message box, a small label shows what your next message will change:
**Editing: Home** (or another page name) changes the whole page.
**Editing: About the facility** (or another section name) appears after you click a section on the page. Only that section changes. Small section edits are also faster.
Click the **x** on the label to go back to the whole page.
### Create a new page with AI
Click **New page with AI** next to the label, then describe the page, for example "Winter storage with pricing and an FAQ." The designer creates the page and opens it. If your site has a navigation bar, the new page is added to it. If it does not, a message offers **Turn on navigation**, which turns on the bar with a link to each of your pages.
To start from a blank page instead, click **+** next to the page tabs and add sections from **Manual edit**. The blank page is called **New page** until you rename it (see below), and it is not added to the navigation bar. Add a link to it under **Structure** > **Navigation bar**.
### Rename, reorder, or delete a page
Open the page, then click the small arrow next to its name in the page tabs. The menu has:
**Rename page** changes the page name and its address (`/p/…`). The home page has no address. Navigation bar links that show the old name switch to the new one.
**Move left** and **Move right** change the order of the page tabs. The home page always stays first.
**Delete page** removes the page after you confirm, together with its navigation bar links. You cannot delete the home page.
Like every other change, these go to your draft. Your live site changes when you publish.
## Use your own photos
Click the **+** button (**Attach images**) in the message box and choose up to five images, such as your building, your team, or your logo.
**Example:** "Use the attached photo of our front gate in the new winter storage section."
Your images are saved to [Marketing Assets](https://www.carstoragesoftware.com/dashboard/marketing/assets) in the **Website uploads** folder, so you can reuse them later. If the designer cannot use an attachment, it tells you after the update.
## Preview on desktop, tablet, and phone
Use the three device buttons above the page to switch between **Desktop view**, **Tablet view**, and **Phone view**. The page rearranges itself exactly as it will for visitors on that screen size. Check the phone view before you publish, because many prospects open your link from a text message.
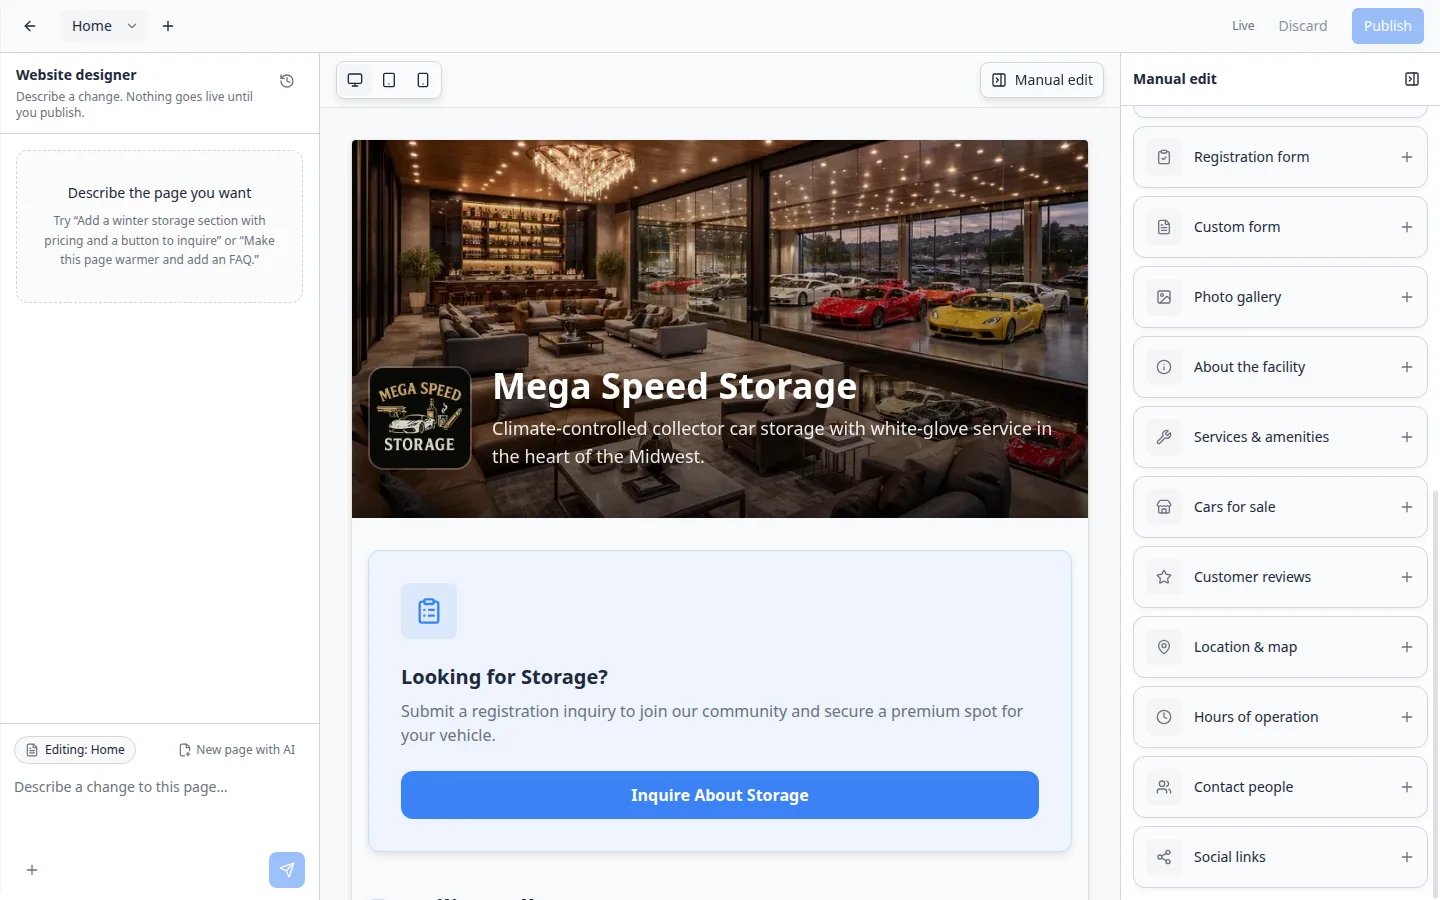 *Click **Manual edit**, then **Add**, to insert **Location & map**, **Hours of operation**, **Contact people**, or **Social links**. Fill in those facts in Settings first. See [Add hours, map, contacts, and social links to your website](/docs/facility-web-pages/add-hours-map-contacts-and-social-to-your-website).*
On a phone, the editor always shows the phone view. The message box floats at the bottom of the screen, the **Edit page** button opens the editing controls, and the three-dot menu holds **Publish**, **Add page**, the options for the current page (**Rename page**, **Move left**, **Move right**, and **Delete page**), and **Discard draft**.
## Undo a change
Every change the designer makes is saved as a version, and the chat stays with your draft, even after you close the editor or switch devices.
* **Undo from here** under one of your messages puts the page back the way it was before that message.
* **Preview this version** under one of the designer's replies switches your draft to the page as it was after that reply.
* The history button in the chat lists every update and has a search box, which helps when the chat gets long.
After you go back to an earlier version, keep chatting or editing from there. To return, click **Preview this version** on a newer reply.
**Hand edits are not saved as versions**
Both buttons replace your draft, not just the view. Only the designer's updates are saved as versions, so changes you made by hand after the designer's last reply are replaced. If you made such changes, the editor asks you to confirm first. Very old versions may no longer be available.
## Publish or discard
The editor works on a **draft**. Your public page does not change until you click **Publish**. Your team shares one draft, so teammates who open the editor see the same changes.
Check each page tab on desktop and phone views. Click every button on the page and check where it goes.
**Expected result:** A short **Published** message appears, and the status changes to **Live**. Open **Main page** from **Shareable links** to see what visitors see.
To throw the draft away, click **Discard**, then **Discard draft**. The editor starts again from your live website.
If you leave with unpublished changes, the classic **Page editor** shows **You have unpublished changes in the website editor** with **Open** and **Discard** buttons.
### When someone changed the live page
If a teammate changed the live page in the classic editor after your draft started, **Publish** stops and shows **Your live website changed**:
* **Review live changes** discards your draft and starts a new one from the live page, so you keep your teammate's changes.
* **Publish anyway** replaces the live page with your draft. Your teammate's changes are lost. You are asked to confirm first.
## What the designer cannot change
The designer writes page sections, text, photos, and buttons. It does not change the facility details below. Change them yourself: click the matching part of the page or open **Manual edit**, or use the classic **Page editor**.
The designer keeps your **HTML** blocks exactly as they are and never writes HTML. To change or remove custom HTML, click the block on the page and edit it in **Manual edit**. If a request would change your custom HTML, the designer stops without changing your page. It tells you to edit custom HTML by hand in **Manual edit**, or to ask for changes to other sections. Rows with custom HTML also keep their row settings as they are, **Full width (edge to edge)** included. A row without HTML that the designer rewrites comes back at the normal contained width.
| Detail | Where to change it |
| - | - |
| Header banner photo | **Structure** > **Header & page settings** |
| Facility slug (page address) | **Structure** > **Header & page settings** |
| Vendor invoice portal | **Structure** > **Header & page settings** |
| Facility description | Click the **About the facility** section |
| Gallery photos | Click the **Photo gallery** section |
| Services & amenities | Click the **Services & amenities** section |
| Customer reviews | Click the **Customer reviews** section |
| Custom HTML blocks | Click the block on the page, then edit it in **Manual edit** |
| Full width rows | Select the content row in **Structure**, then turn on **Full width (edge to edge)** under **Row settings** in **Edit** |
| Registration and marketplace switches | Click the **Storage inquiry**, **Registration form**, or **Cars for sale** section, or use [Settings > Website & customer app](https://www.carstoragesoftware.com/dashboard/settings/website) and [Settings > Customer onboarding](https://www.carstoragesoftware.com/dashboard/settings/customer-onboarding) |
| Public Facility Pages switch | [Settings > Website & customer app](https://www.carstoragesoftware.com/dashboard/settings/website) |
| Page names, addresses, and order | The arrow on the current page tab (see [Rename, reorder, or delete a page](#rename-reorder-or-delete-a-page)) |
**These details go live right away**
The banner, slug, vendor invoice portal, description, gallery photos, services, reviews, and the registration and marketplace switches (including marketplace visibility) are not part of the draft. When you change them, even inside the website editor, the change appears on your public page right away without **Publish**.
## Stock photo credits
When the designer picks a photo from a public photo library, it adds a small credit line under the photo, with the photo title, the photographer, and the license, such as "Photo: Red convertible by (photographer), CC BY 2.0". The photo license requires it, so keep the credit whenever you keep the photo. Your own uploaded photos get no credit line.
## Tips and troubleshooting
**The update says: worth a quick review**
The designer checks its own work. **Page updated · worth a quick review** means the check found something it could not fully fix. Look over the page, then ask for a fix or adjust it in **Manual edit**.
**A message asks me to add a link or a photo**
If the designer does not know where a button should go, it says **Add the link for the "..." button.** Click the button on the page and fill in its link in **Edit**. If it could not find a good photo, add one the same way. Next time, include the full link or attach the photo in your request.
**A section on the page shows a gray hint**
Some built-in sections stay hidden on your public page until they have something to show. In the editor, they show a hint instead, such as **Customer reviews: hidden until you select reviews** or **Photo gallery: hidden until you add facility photos**. Click the section to fill it in, or remove it in **Structure**.
**Too many AI requests**
Each person can send about 12 requests every 10 minutes. The message tells you how long to wait. You can keep editing by hand in **Manual edit** meanwhile.
**The draft changed in another tab**
If you or a teammate edit the same draft in two places, the editor reloads the latest draft and asks you to send your message again.
**Set your public page address first**
If the designer says **Set your public page address before using the website designer.**, open **Structure** > **Header & page settings** and save a **Facility slug**.
**I do not see the Open website editor button**
Check that **Public Facility Pages** is on. If it is, your team may not have the beta yet, or your role may not include Marketing edit access. Ask a team admin to check your permissions in [Settings > Team](https://www.carstoragesoftware.com/dashboard/settings/team), or contact support.
## What to do next
After you publish, run the [Go live checklist for public pages](/docs/facility-web-pages/go-live-checklist-for-public-pages) before you share the link widely. For the classic editor and the built-in sections, see [Configure the facility landing page](/docs/facility-web-pages/configure-the-facility-landing-page).
## Related topics
- [Add hours, map, contacts, and social links to your website](/docs/facility-web-pages/add-hours-map-contacts-and-social-to-your-website.md)
- [Configure the facility landing page](/docs/facility-web-pages/configure-the-facility-landing-page.md)
- [Go live checklist for public pages](/docs/facility-web-pages/go-live-checklist-for-public-pages.md)
- [Facility Web Pages overview](/docs/facility-web-pages/overview.md)
- [Embed a custom form on your website](/docs/marketing-events/embed-a-custom-form-on-your-website.md)
This documentation is built and hosted on [Mintlify](https://mintlify.com), a developer documentation platform.
*Click **Manual edit**, then **Add**, to insert **Location & map**, **Hours of operation**, **Contact people**, or **Social links**. Fill in those facts in Settings first. See [Add hours, map, contacts, and social links to your website](/docs/facility-web-pages/add-hours-map-contacts-and-social-to-your-website).*
On a phone, the editor always shows the phone view. The message box floats at the bottom of the screen, the **Edit page** button opens the editing controls, and the three-dot menu holds **Publish**, **Add page**, the options for the current page (**Rename page**, **Move left**, **Move right**, and **Delete page**), and **Discard draft**.
## Undo a change
Every change the designer makes is saved as a version, and the chat stays with your draft, even after you close the editor or switch devices.
* **Undo from here** under one of your messages puts the page back the way it was before that message.
* **Preview this version** under one of the designer's replies switches your draft to the page as it was after that reply.
* The history button in the chat lists every update and has a search box, which helps when the chat gets long.
After you go back to an earlier version, keep chatting or editing from there. To return, click **Preview this version** on a newer reply.
**Hand edits are not saved as versions**
Both buttons replace your draft, not just the view. Only the designer's updates are saved as versions, so changes you made by hand after the designer's last reply are replaced. If you made such changes, the editor asks you to confirm first. Very old versions may no longer be available.
## Publish or discard
The editor works on a **draft**. Your public page does not change until you click **Publish**. Your team shares one draft, so teammates who open the editor see the same changes.
Check each page tab on desktop and phone views. Click every button on the page and check where it goes.
**Expected result:** A short **Published** message appears, and the status changes to **Live**. Open **Main page** from **Shareable links** to see what visitors see.
To throw the draft away, click **Discard**, then **Discard draft**. The editor starts again from your live website.
If you leave with unpublished changes, the classic **Page editor** shows **You have unpublished changes in the website editor** with **Open** and **Discard** buttons.
### When someone changed the live page
If a teammate changed the live page in the classic editor after your draft started, **Publish** stops and shows **Your live website changed**:
* **Review live changes** discards your draft and starts a new one from the live page, so you keep your teammate's changes.
* **Publish anyway** replaces the live page with your draft. Your teammate's changes are lost. You are asked to confirm first.
## What the designer cannot change
The designer writes page sections, text, photos, and buttons. It does not change the facility details below. Change them yourself: click the matching part of the page or open **Manual edit**, or use the classic **Page editor**.
The designer keeps your **HTML** blocks exactly as they are and never writes HTML. To change or remove custom HTML, click the block on the page and edit it in **Manual edit**. If a request would change your custom HTML, the designer stops without changing your page. It tells you to edit custom HTML by hand in **Manual edit**, or to ask for changes to other sections. Rows with custom HTML also keep their row settings as they are, **Full width (edge to edge)** included. A row without HTML that the designer rewrites comes back at the normal contained width.
| Detail | Where to change it |
| - | - |
| Header banner photo | **Structure** > **Header & page settings** |
| Facility slug (page address) | **Structure** > **Header & page settings** |
| Vendor invoice portal | **Structure** > **Header & page settings** |
| Facility description | Click the **About the facility** section |
| Gallery photos | Click the **Photo gallery** section |
| Services & amenities | Click the **Services & amenities** section |
| Customer reviews | Click the **Customer reviews** section |
| Custom HTML blocks | Click the block on the page, then edit it in **Manual edit** |
| Full width rows | Select the content row in **Structure**, then turn on **Full width (edge to edge)** under **Row settings** in **Edit** |
| Registration and marketplace switches | Click the **Storage inquiry**, **Registration form**, or **Cars for sale** section, or use [Settings > Website & customer app](https://www.carstoragesoftware.com/dashboard/settings/website) and [Settings > Customer onboarding](https://www.carstoragesoftware.com/dashboard/settings/customer-onboarding) |
| Public Facility Pages switch | [Settings > Website & customer app](https://www.carstoragesoftware.com/dashboard/settings/website) |
| Page names, addresses, and order | The arrow on the current page tab (see [Rename, reorder, or delete a page](#rename-reorder-or-delete-a-page)) |
**These details go live right away**
The banner, slug, vendor invoice portal, description, gallery photos, services, reviews, and the registration and marketplace switches (including marketplace visibility) are not part of the draft. When you change them, even inside the website editor, the change appears on your public page right away without **Publish**.
## Stock photo credits
When the designer picks a photo from a public photo library, it adds a small credit line under the photo, with the photo title, the photographer, and the license, such as "Photo: Red convertible by (photographer), CC BY 2.0". The photo license requires it, so keep the credit whenever you keep the photo. Your own uploaded photos get no credit line.
## Tips and troubleshooting
**The update says: worth a quick review**
The designer checks its own work. **Page updated · worth a quick review** means the check found something it could not fully fix. Look over the page, then ask for a fix or adjust it in **Manual edit**.
**A message asks me to add a link or a photo**
If the designer does not know where a button should go, it says **Add the link for the "..." button.** Click the button on the page and fill in its link in **Edit**. If it could not find a good photo, add one the same way. Next time, include the full link or attach the photo in your request.
**A section on the page shows a gray hint**
Some built-in sections stay hidden on your public page until they have something to show. In the editor, they show a hint instead, such as **Customer reviews: hidden until you select reviews** or **Photo gallery: hidden until you add facility photos**. Click the section to fill it in, or remove it in **Structure**.
**Too many AI requests**
Each person can send about 12 requests every 10 minutes. The message tells you how long to wait. You can keep editing by hand in **Manual edit** meanwhile.
**The draft changed in another tab**
If you or a teammate edit the same draft in two places, the editor reloads the latest draft and asks you to send your message again.
**Set your public page address first**
If the designer says **Set your public page address before using the website designer.**, open **Structure** > **Header & page settings** and save a **Facility slug**.
**I do not see the Open website editor button**
Check that **Public Facility Pages** is on. If it is, your team may not have the beta yet, or your role may not include Marketing edit access. Ask a team admin to check your permissions in [Settings > Team](https://www.carstoragesoftware.com/dashboard/settings/team), or contact support.
## What to do next
After you publish, run the [Go live checklist for public pages](/docs/facility-web-pages/go-live-checklist-for-public-pages) before you share the link widely. For the classic editor and the built-in sections, see [Configure the facility landing page](/docs/facility-web-pages/configure-the-facility-landing-page).
## Related topics
- [Add hours, map, contacts, and social links to your website](/docs/facility-web-pages/add-hours-map-contacts-and-social-to-your-website.md)
- [Configure the facility landing page](/docs/facility-web-pages/configure-the-facility-landing-page.md)
- [Go live checklist for public pages](/docs/facility-web-pages/go-live-checklist-for-public-pages.md)
- [Facility Web Pages overview](/docs/facility-web-pages/overview.md)
- [Embed a custom form on your website](/docs/marketing-events/embed-a-custom-form-on-your-website.md)
This documentation is built and hosted on [Mintlify](https://mintlify.com), a developer documentation platform.