> ## Documentation Index
> Fetch the complete documentation index at: https://www.carstoragesoftware.com/docs/llms.txt
> Use this file to discover all available pages before exploring further.
# Create an all-day event
> Schedule work that can happen anytime on a given day, without picking a clock time.
## What you will accomplish
You will turn on **All day** when you create an event on [Schedule](https://www.carstoragesoftware.com/dashboard/schedule) so the visit sits in the **ALL DAY** row instead of a timed hour slot.
**Expected outcome:** Your team sees the work on that date, can finish it whenever the day allows, and nobody is waiting for a 9:00 AM start that was never real.
## When to use All day (instead of a time slot)
Use **All day** when the work is real, but the **clock time does not matter**.
* A battery tender walkthrough or storage check that staff can do anytime that day.
* A “hold this car for concours prep” day with no customer drop-off time.
* Internal shop work (inventory, bay reset) that should stay visible all day.
* A **Calendar Block** that closes the whole day so nobody else can book it.
**When to pick a time instead**
If a customer is arriving, a transporter is coming, or a bay is reserved for a window of time, leave **All day** off and pick a highlighted slot. See [Create an appointment](/docs/schedule/create-an-appointment).
## Before you start
* Open [Schedule](https://www.carstoragesoftware.com/dashboard/schedule).
* Know the **date**, the **event type**, and the vehicle or customer (if the work needs one).
* Write one short note about what “done” looks like, since there is no start time to explain the visit.
## Create an all-day customer or vehicle event
Go to [Schedule](https://www.carstoragesoftware.com/dashboard/schedule) and click **Schedule Event** near the top-right.
**Expected result:** A window titled **Create New Event** opens.
Choose the **EVENT TYPE OR WORKFLOW** (for example **Internal Service**). Search for the **VEHICLE** if the work is about a car. Set **ASSIGNED TO** if you already know who owns it, and add a **DESCRIPTION (OPTIONAL)** the next person can trust.
**Why this matters:** All-day work is easy to forget if the note is vague. A good note is “Complete the battery tender walkthrough anytime today. No customer arrival.”
Look at the **right** side of the window, above the date and time slots.
You will see **All day** with the helper text **No timed slot — the team can do this anytime that day.**
**Expected result:** Time slots are still visible while the switch is off. That is normal.
Click the **All day** switch so it moves to the on position.
**Expected result:** The time-slot grid disappears. A **Date** picker stays. Under it you see: **This event will appear as all day on the schedule — no specific start time.**
Use the **Date** field if you need a different day. Then click **Create Event**.
**Expected result:** The window closes. The event appears in the **ALL DAY** row on that date, not at 9:00 AM or 2:00 PM.
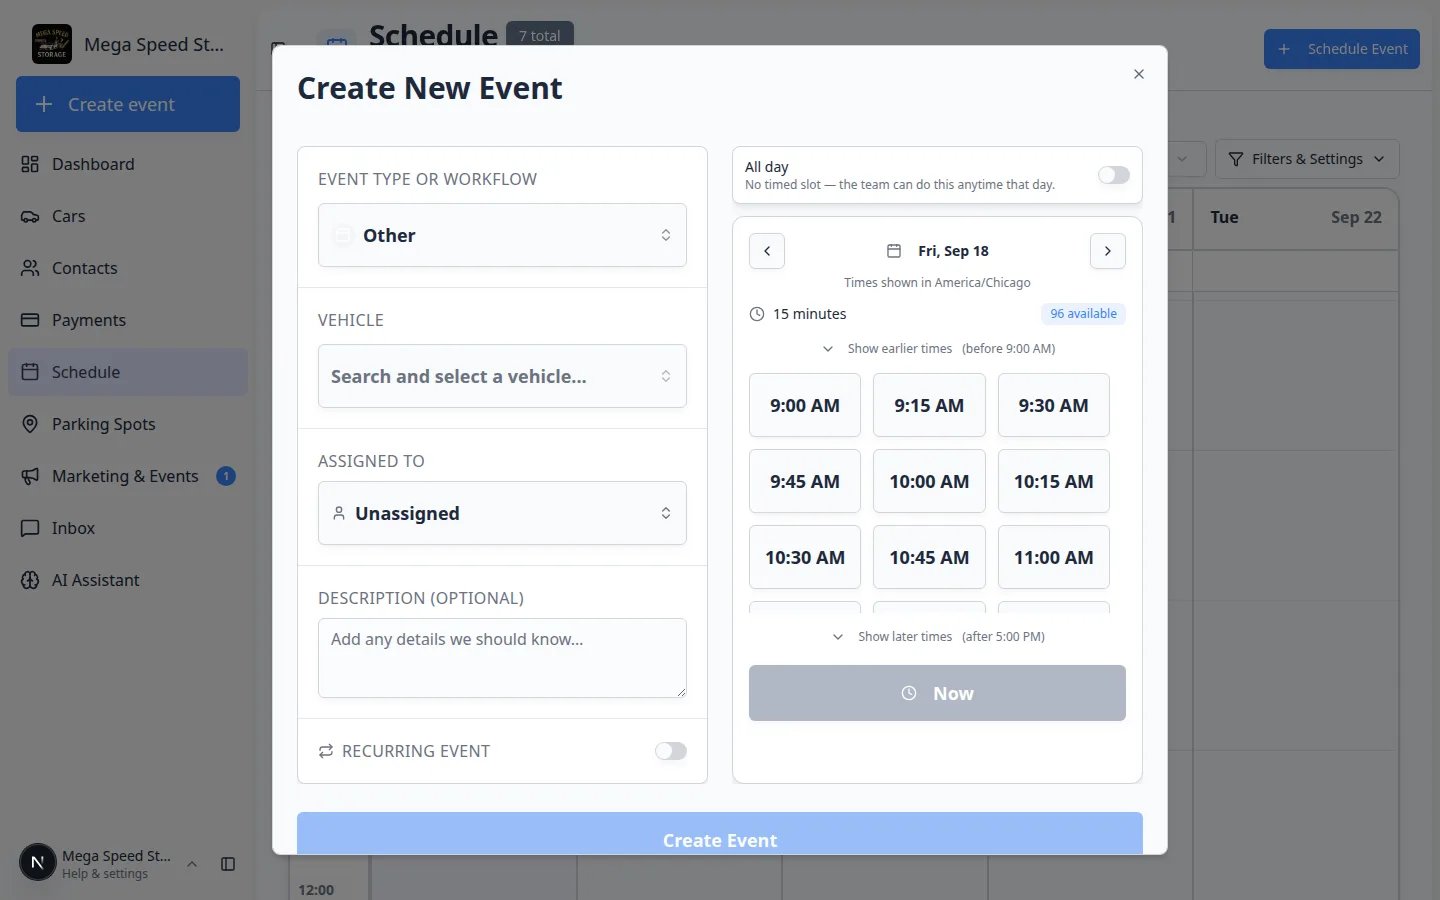 ***All day** lives on the right side of **Create New Event**, above the date. Leave it off when the customer is coming at a real time.*
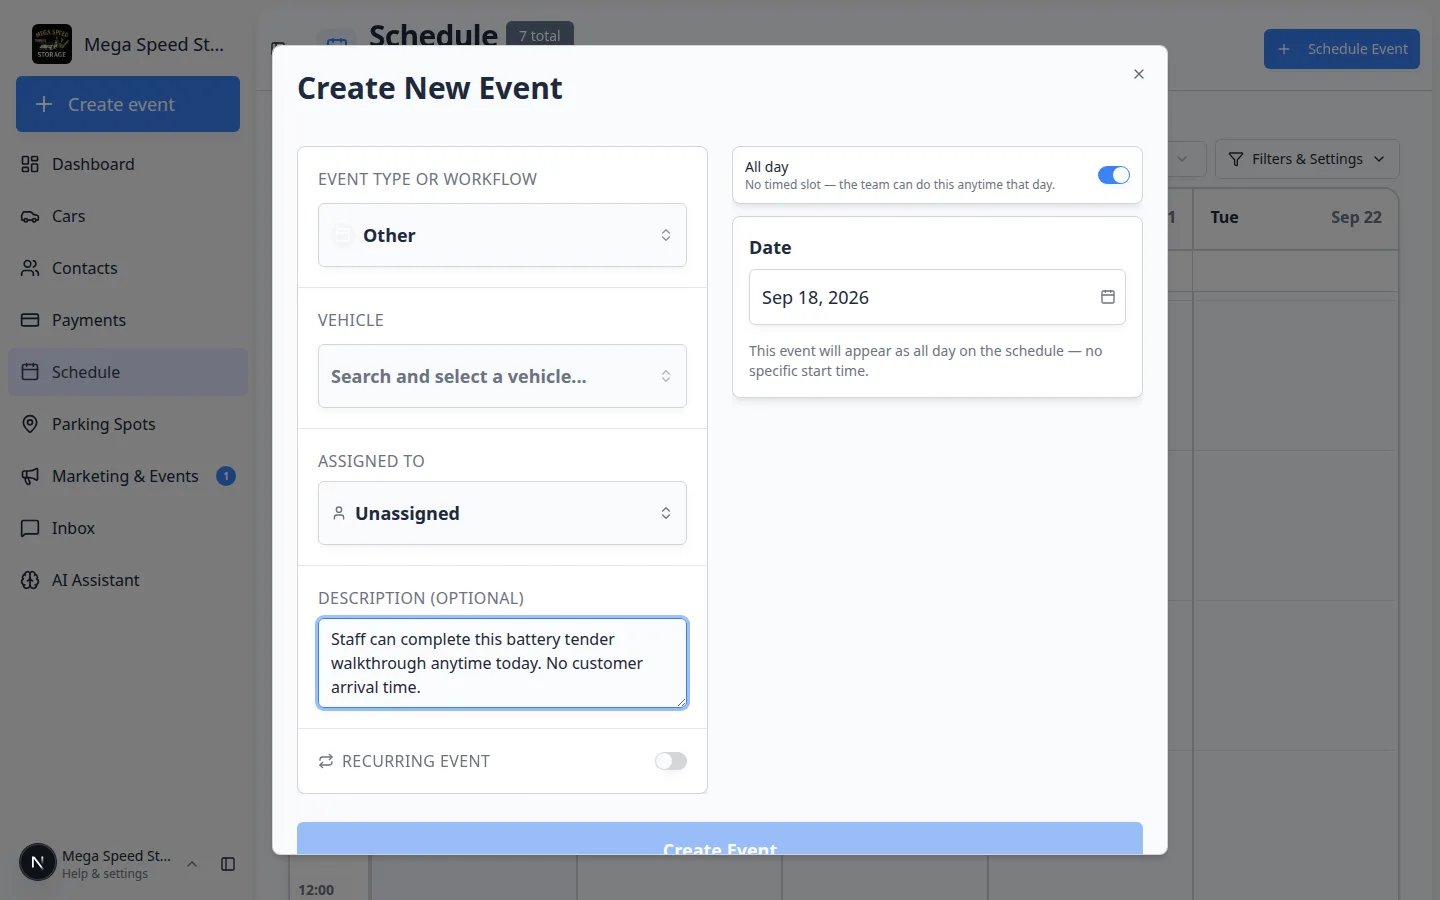 *When **All day** is on, the time slots go away. You only pick a **Date**. The helper text confirms there is no start time.*
## See it on the calendar
All-day work sits in its own lane so it does not hide timed visits.
If you do not see a time grid, open **Filters & Settings**, choose **Calendar**, and pick **5 Day** or **3 Day**.
At the top of the grid, above the hour lines, find the row labeled **ALL DAY**.
**Expected result:** Your all-day events appear as colored bars on that row. Timed visits stay in the hour columns below.
Click the colored bar.
**Expected result:** The detail window shows **SCHEDULED FOR** the date, an **All day** badge, and the word **All day** next to the clock, not a start time like 10:00 AM.
*When **All day** is on, the time slots go away. You only pick a **Date**. The helper text confirms there is no start time.*
## See it on the calendar
All-day work sits in its own lane so it does not hide timed visits.
If you do not see a time grid, open **Filters & Settings**, choose **Calendar**, and pick **5 Day** or **3 Day**.
At the top of the grid, above the hour lines, find the row labeled **ALL DAY**.
**Expected result:** Your all-day events appear as colored bars on that row. Timed visits stay in the hour columns below.
Click the colored bar.
**Expected result:** The detail window shows **SCHEDULED FOR** the date, an **All day** badge, and the word **All day** next to the clock, not a start time like 10:00 AM.
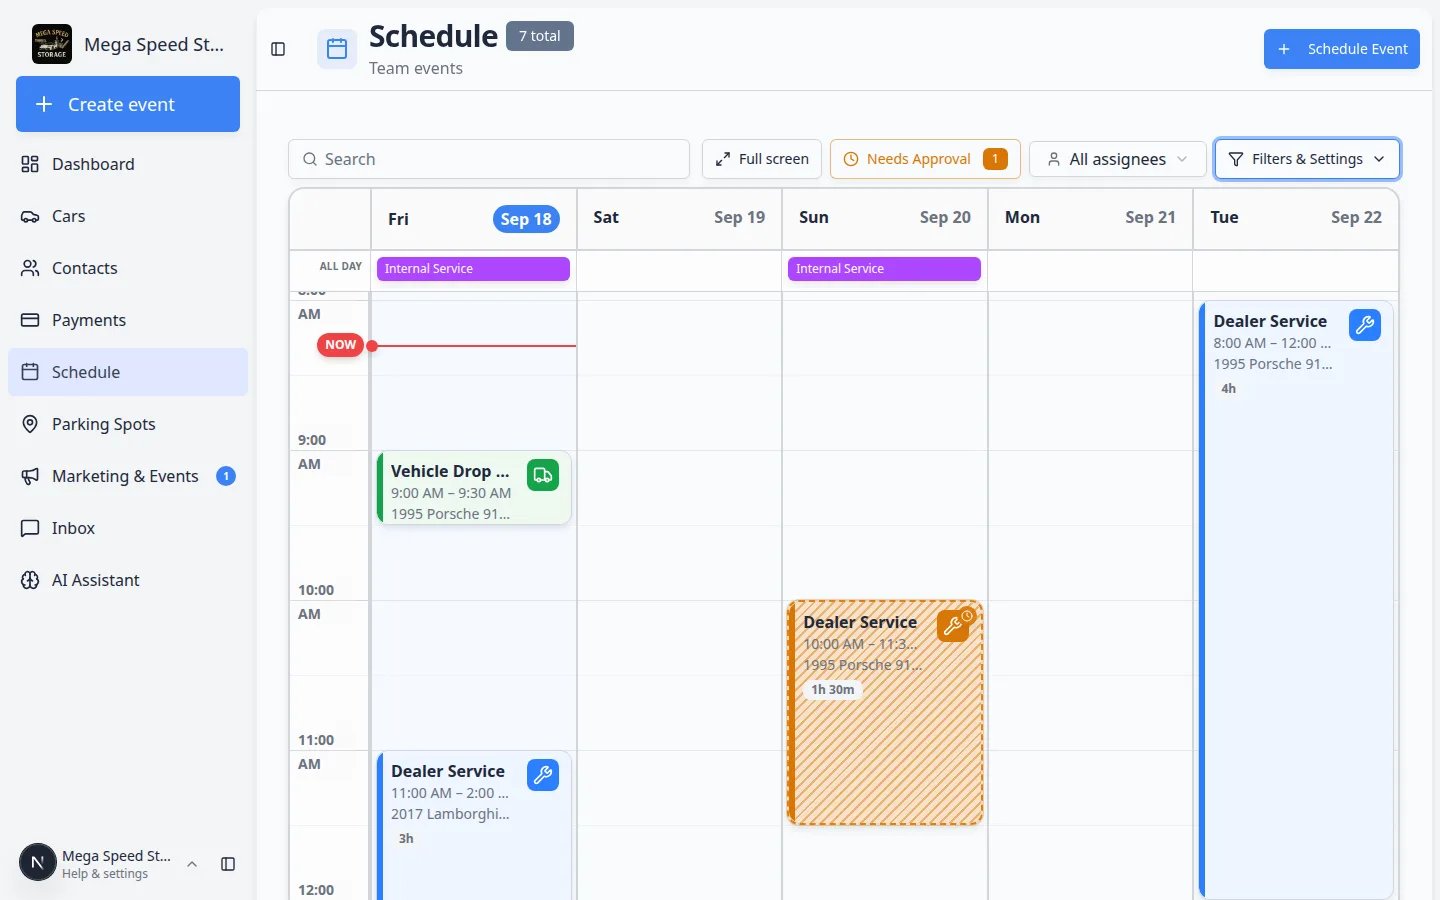 *The **ALL DAY** row sits above the hours. Use it to spot work that can happen anytime that day.*
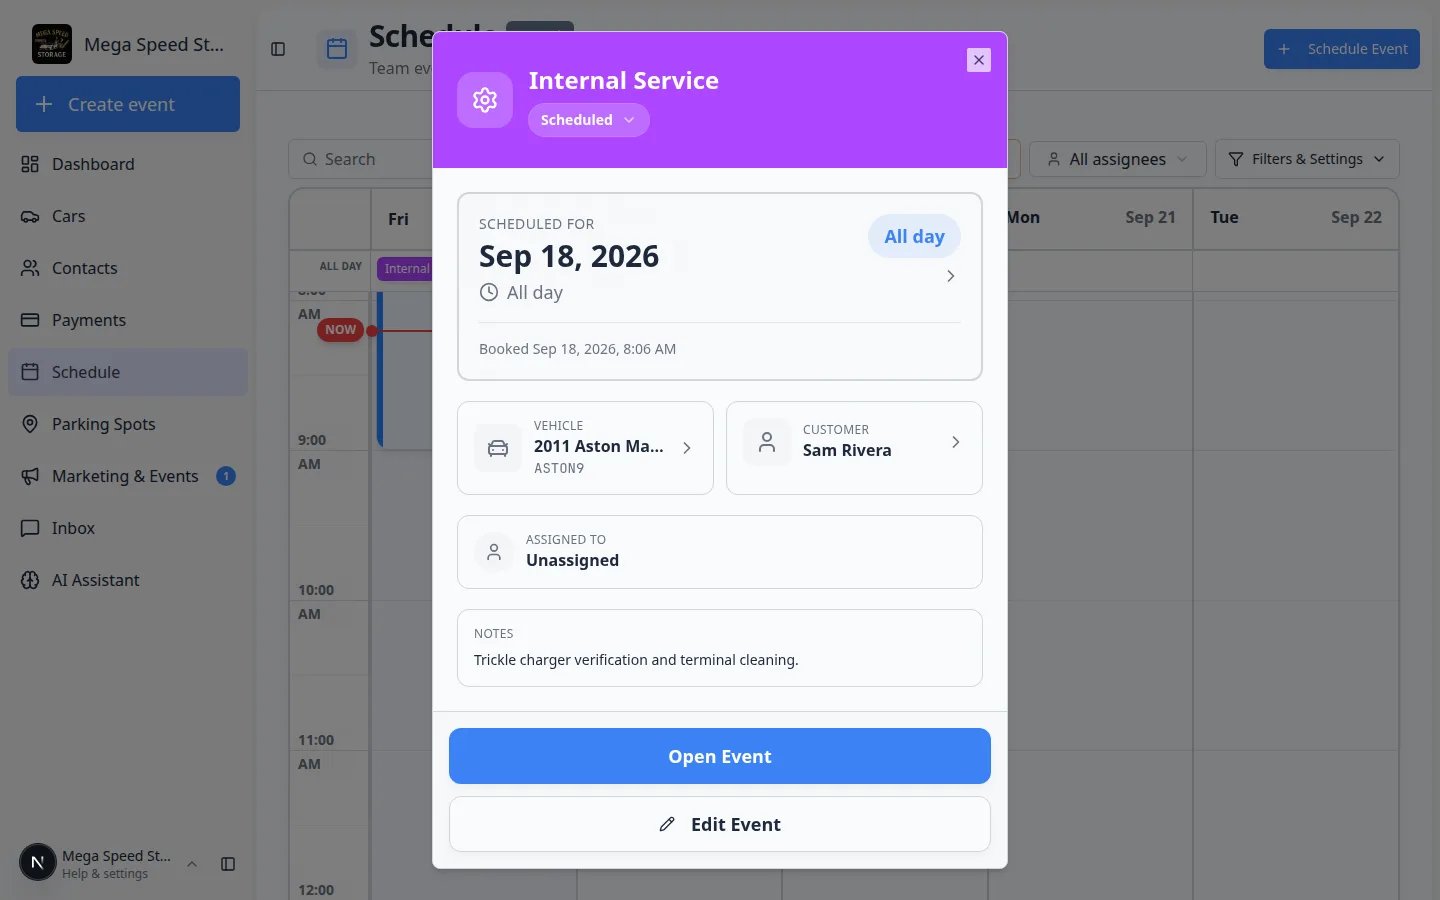 *Open an all-day bar to confirm the date. You should see **All day**, not a clock time. Use **Open Event** when someone is doing the work, or **Edit Event** to change the plan.*
## Block a whole day (Calendar Block)
Use this when the shop should not accept bookings that day: training, a holiday, or a full bay reset.
On [Schedule](https://www.carstoragesoftware.com/dashboard/schedule), click **Schedule Event**.
In **EVENT TYPE OR WORKFLOW**, choose **Calendar Block**.
**Expected result:** The right side changes to **Block Time** with the note **Prevent events from being scheduled during this period**.
Turn on **All day**. The helper text says **Block the entire day so nothing else can be scheduled.**
**Expected result:** Start and end times disappear. You only pick a **Date**. Under the date you see **This block will cover the whole day on the schedule.**
In **Reason (Optional)**, write something your team will understand, such as “Shop closed for team training and bay reset.” Then click **Create Event**.
**Expected result:** That date is blocked. Staff should not promise customer visits on it.
*Open an all-day bar to confirm the date. You should see **All day**, not a clock time. Use **Open Event** when someone is doing the work, or **Edit Event** to change the plan.*
## Block a whole day (Calendar Block)
Use this when the shop should not accept bookings that day: training, a holiday, or a full bay reset.
On [Schedule](https://www.carstoragesoftware.com/dashboard/schedule), click **Schedule Event**.
In **EVENT TYPE OR WORKFLOW**, choose **Calendar Block**.
**Expected result:** The right side changes to **Block Time** with the note **Prevent events from being scheduled during this period**.
Turn on **All day**. The helper text says **Block the entire day so nothing else can be scheduled.**
**Expected result:** Start and end times disappear. You only pick a **Date**. Under the date you see **This block will cover the whole day on the schedule.**
In **Reason (Optional)**, write something your team will understand, such as “Shop closed for team training and bay reset.” Then click **Create Event**.
**Expected result:** That date is blocked. Staff should not promise customer visits on it.
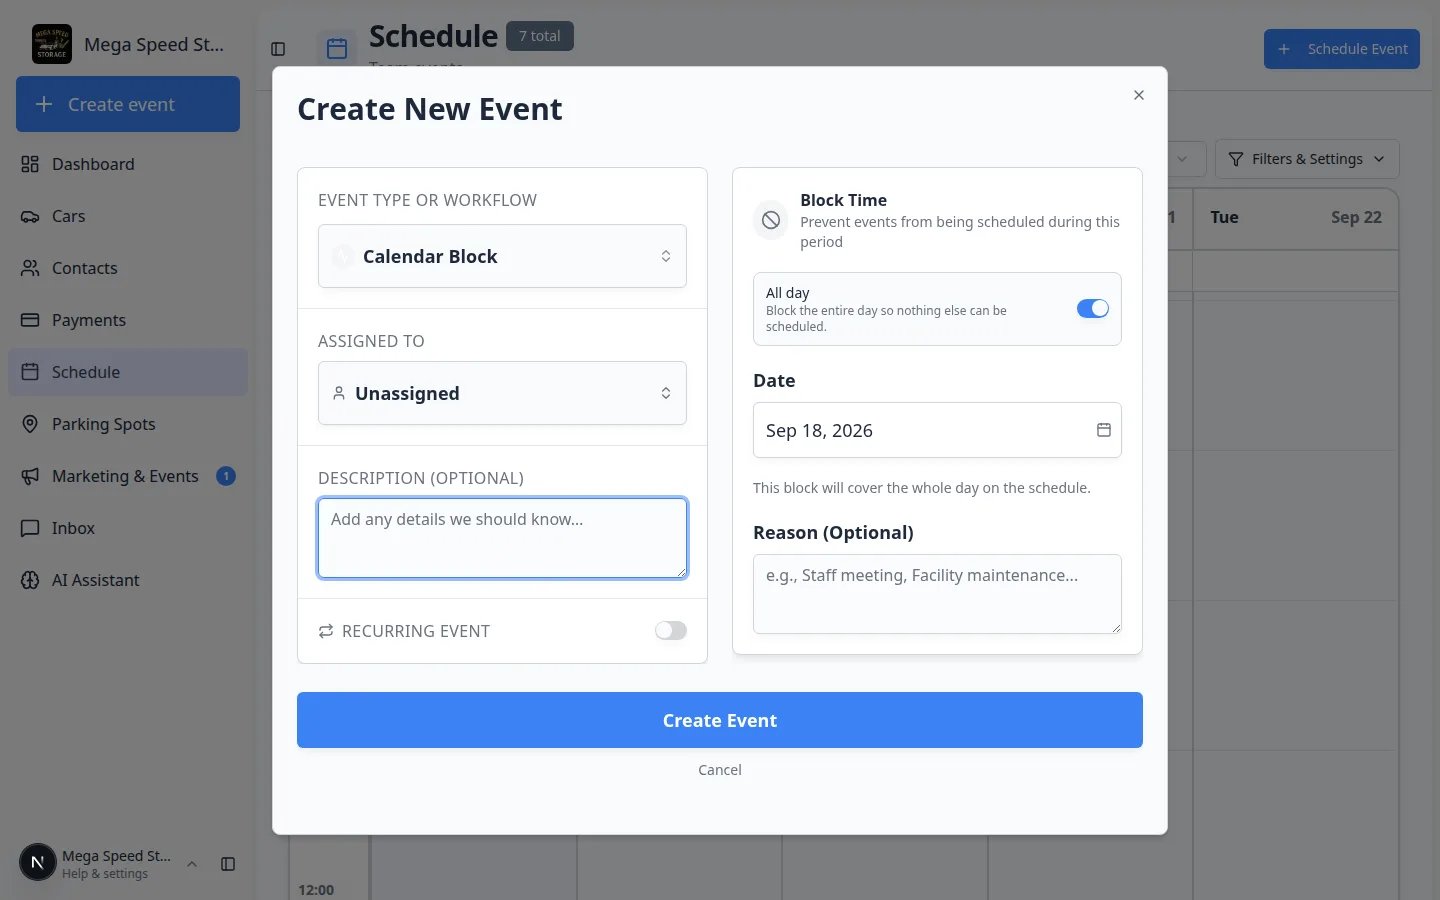 *For a full closed day, choose **Calendar Block**, turn **All day** on, and add a short **Reason**. This is different from a customer visit.*
**Do not use Calendar Block for customer work**
**Calendar Block** reserves the facility. For a customer or vehicle visit that can happen anytime that day, choose the real event type (for example **Internal Service**) and turn **All day** on there instead.
## Change an all-day event later
Click the bar on the **ALL DAY** row.
Use **Edit Event** to change the date, notes, assignee, or to turn **All day** off if the visit now has a real time.
Timed events can often be dragged to a new hour. All-day events live in the top row, so changing the **date** is safer from **Edit Event**.
**Why this matters:** If a drag does not stick, the visit is not lost. Open **Edit Event** and pick the new date.
For status changes (started, finished), use the status control at the top of the detail window or follow [Update, assign, or reschedule an event](/docs/schedule/update-assign-or-reschedule-an-event).
## Combine All day with a repeating series
You can turn on **All day** and **RECURRING EVENT** on the same form.
Example: a weekly battery tender walkthrough that has no customer arrival time.
Set the first **Date**, turn **All day** on, then turn **RECURRING EVENT** on and choose the repeat pattern. Full steps: [Create recurring appointments](/docs/schedule/create-recurring-appointments).
## What success looks like
* The event sits in the **ALL DAY** row on the correct date.
* The detail window shows **All day**, not a start time.
* Timed customer visits still have their own hour blocks underneath.
* Staff know they can finish the work anytime that day, and the note explains what “done” means.
## Common mistakes
**Do not use All day for a pickup or drop-off**
If someone is arriving at 2:00 PM, pick 2:00 PM. An all-day drop-off hides the arrival time and causes wait time at the gate.
**The All day switch is on the right**
People often look at the bottom next to **RECURRING EVENT**. **All day** is on the **right**, above the date. If you do not see it, you may still be choosing the event type. Pick a type first, then look at the right column.
**Customers may see the visit**
If this event type is set so customers can see it, the visit can appear in the customer portal without a clock time. Tell the customer “we will do this on Tuesday,” not “see you at 9.” Admins set who can see each type in [Settings → Events & schedule](https://www.carstoragesoftware.com/dashboard/settings/events). See [Configure event types](/docs/events/configure-event-types).
## Troubleshooting
**I do not see All day**
Confirm you clicked **Schedule Event** from the staff [Schedule](https://www.carstoragesoftware.com/dashboard/schedule) page. The switch is for staff. If it is still missing, ask an admin whether your role can create scheduled work in [Settings → Team](https://www.carstoragesoftware.com/dashboard/settings/team).
**The calendar looks empty except the ALL DAY row**
Timed visits may sit in early or late hours. Open **Filters & Settings** and choose **Full Day** under the visible hours, or scroll the time grid. All-day work stays in the top row no matter which hours you show.
**I picked the wrong day**
Click the bar, click **Edit Event**, and change the **Date**. You do not need to delete the event.
## What to do next
* Put a timed visit on the calendar: [Create an appointment](/docs/schedule/create-an-appointment)
* Repeat the same all-day work every week: [Create recurring appointments](/docs/schedule/create-recurring-appointments)
* Run photos or checklists from the visit: [Run event workflow from Schedule](/docs/schedule/run-event-workflow-from-schedule)
* Return to [Schedule overview](/docs/schedule/overview)
## Related topics
- [Update, assign, or reschedule an event](/docs/schedule/update-assign-or-reschedule-an-event.md)
- [Create an appointment](/docs/schedule/create-an-appointment.md)
- [Assign team members and vendors to events](/docs/schedule/assign-team-members-and-vendors.md)
- [Create recurring appointments](/docs/schedule/create-recurring-appointments.md)
- [Run event workflow from Schedule](/docs/schedule/run-event-workflow-from-schedule.md)
This documentation is built and hosted on [Mintlify](https://mintlify.com), a developer documentation platform.
*For a full closed day, choose **Calendar Block**, turn **All day** on, and add a short **Reason**. This is different from a customer visit.*
**Do not use Calendar Block for customer work**
**Calendar Block** reserves the facility. For a customer or vehicle visit that can happen anytime that day, choose the real event type (for example **Internal Service**) and turn **All day** on there instead.
## Change an all-day event later
Click the bar on the **ALL DAY** row.
Use **Edit Event** to change the date, notes, assignee, or to turn **All day** off if the visit now has a real time.
Timed events can often be dragged to a new hour. All-day events live in the top row, so changing the **date** is safer from **Edit Event**.
**Why this matters:** If a drag does not stick, the visit is not lost. Open **Edit Event** and pick the new date.
For status changes (started, finished), use the status control at the top of the detail window or follow [Update, assign, or reschedule an event](/docs/schedule/update-assign-or-reschedule-an-event).
## Combine All day with a repeating series
You can turn on **All day** and **RECURRING EVENT** on the same form.
Example: a weekly battery tender walkthrough that has no customer arrival time.
Set the first **Date**, turn **All day** on, then turn **RECURRING EVENT** on and choose the repeat pattern. Full steps: [Create recurring appointments](/docs/schedule/create-recurring-appointments).
## What success looks like
* The event sits in the **ALL DAY** row on the correct date.
* The detail window shows **All day**, not a start time.
* Timed customer visits still have their own hour blocks underneath.
* Staff know they can finish the work anytime that day, and the note explains what “done” means.
## Common mistakes
**Do not use All day for a pickup or drop-off**
If someone is arriving at 2:00 PM, pick 2:00 PM. An all-day drop-off hides the arrival time and causes wait time at the gate.
**The All day switch is on the right**
People often look at the bottom next to **RECURRING EVENT**. **All day** is on the **right**, above the date. If you do not see it, you may still be choosing the event type. Pick a type first, then look at the right column.
**Customers may see the visit**
If this event type is set so customers can see it, the visit can appear in the customer portal without a clock time. Tell the customer “we will do this on Tuesday,” not “see you at 9.” Admins set who can see each type in [Settings → Events & schedule](https://www.carstoragesoftware.com/dashboard/settings/events). See [Configure event types](/docs/events/configure-event-types).
## Troubleshooting
**I do not see All day**
Confirm you clicked **Schedule Event** from the staff [Schedule](https://www.carstoragesoftware.com/dashboard/schedule) page. The switch is for staff. If it is still missing, ask an admin whether your role can create scheduled work in [Settings → Team](https://www.carstoragesoftware.com/dashboard/settings/team).
**The calendar looks empty except the ALL DAY row**
Timed visits may sit in early or late hours. Open **Filters & Settings** and choose **Full Day** under the visible hours, or scroll the time grid. All-day work stays in the top row no matter which hours you show.
**I picked the wrong day**
Click the bar, click **Edit Event**, and change the **Date**. You do not need to delete the event.
## What to do next
* Put a timed visit on the calendar: [Create an appointment](/docs/schedule/create-an-appointment)
* Repeat the same all-day work every week: [Create recurring appointments](/docs/schedule/create-recurring-appointments)
* Run photos or checklists from the visit: [Run event workflow from Schedule](/docs/schedule/run-event-workflow-from-schedule)
* Return to [Schedule overview](/docs/schedule/overview)
## Related topics
- [Update, assign, or reschedule an event](/docs/schedule/update-assign-or-reschedule-an-event.md)
- [Create an appointment](/docs/schedule/create-an-appointment.md)
- [Assign team members and vendors to events](/docs/schedule/assign-team-members-and-vendors.md)
- [Create recurring appointments](/docs/schedule/create-recurring-appointments.md)
- [Run event workflow from Schedule](/docs/schedule/run-event-workflow-from-schedule.md)
This documentation is built and hosted on [Mintlify](https://mintlify.com), a developer documentation platform.